Pages

Showing posts with label activities. Show all posts

Wednesday, September 18, 2013

Rising Heat

Hot and Cold
  • blue or green colored ice
  • red food coloring
  • warm water
  • large container
Make blue or green colored ice (see the beginning of Mixing Colors for an explanation). Fill the large container with warm water. Make sure the container is as still as possible (as in, not on a rickety folding table). Try to minimize it's movement throughout this activity. On one side drop in a few ice cubes, on the other side put in a few drops of red food coloring. Now observe.

The red is hot water and the green is cold.
You can talk about a few things with this activity. One is why the food coloring spreads out instead of just staying where you dropped it. This is because the molecules in water are always moving. Their movement knocks around the food coloring molecules and causes them to spread out. You may also notice that the red spreads out faster than the blue. This is partly because the blue starts out trapped in the ice, but also because the molecules in the hot water are moving faster. Heat is energy. If you have more energy, you move around more. The same is true for molecules. So the faster moving warm water molecules knock into the food coloring more than the slower moving cold water molecules, thus spreading the color around faster.

The main point of my explanation when I did this was about the layering of the colors (I had this as part of my weather themed activity set). If you don't disturb the water, eventually the red water will be in the top half of the container, and the blue water will be in the bottom half. This is because the blue food coloring is staying with the cool water, and the red with the warm water. The reason the different temperature waters separate is because of density. Density is mass/volume, or how much stuff there is in a certain amount of space. Hot water is less dense than cool water. My friend had a really good intuitive explanation as to why this is true:

Think of a bunch of kids sitting at a table. Right now that don't have much energy, so they stay where they are. Then you give them a bunch of energy. Now they are probably running all around the room, and only a few are still at the table. The kids represent the molecules in the fluid. The energy you give them is heat. The table is the space we're comparing. In the first case there are a lot of kids at the table, or a lot of stuff in the area, so it is pretty dense. In the second kids, only a few kids are at the table so there is less stuff in the area and the density is lower.

Learn More:
http://www.landa.com/docs/HotWatervsColdWater.pdf
http://www.mansfieldct.org/Schools/MMS/staff/hand/atomsheat.htm
http://phet.colorado.edu/en/simulation/density
 

Thursday, September 5, 2013

Icy Fun

These activities all involve ice and color to help cool down the last few days of summer.

Some green ice.
Mixing Colors (for young children)
  • food coloring
  • water
  • ice trays (or small containers to freeze the water in)
  • bowls/cups (preferably light colored or clear)
You need to make ice cubes in several different colors. To this, first add a few drops of food coloring to some water, mix it, then pour it in the ice tray and freeze it. I assume if you don't mix it, the food coloring won't be evenly distributed, but I haven't actually tried. That might be another experiment you can tie in - seeing how the ice looks when the food coloring wasn't mixed. Have at least the primary colors, but use more if you want!

Then pair up different colors in different bowls. As the ice cubes melt, the colors will start to mix. See if the kids can guess ahead of time which colors will form. Once you've done it with just pairs of colors, try it with three different colored ice cubes.

Rainbow Tunnels
  • food coloring (or other form of liquid color)
  • salt
  • water
  • large-ish containers
Freeze several BIG ice cubes using the large containers. If you want your ice cubes to have more interesting shapes, you can fill a balloon or plastic baggie with water and freeze that. You will probably have to leave them overnight. When you actually want to start the activity, do it outside or in a large box - somewhere you won't mind things getting all wet.

Image from artsandcreativity.blogspot.com
 In several small dishes, put a bit of water, salt and food coloring. Set yourself up with a nice variety of colors. Now the fun begins! Start pouring the colors onto the ice. Don't pour too much at once, an eyedropper or even a spoon would be helpful. Also BE CAREFUL. Salt lowers the freezing point of ice, so the ice gets colder . If you have salt on your skin and then put ice on it, you can get a minor form of frostbite. So I would not recommend touching these ice cubes or the salt water colors with your bare hands. It is the salt lowering the melting point that makes this work (it is also what allows you to make your own ice cream). When you add salt the ice immediately around it starts to melt. The salt then slowly melts a tunnel through the ice. If you do this outside, not only will the warmth help melt the ice cubes faster, the light makes the ice cubes look really cool (no pun intended).

Learn more:
http://antoine.frostburg.edu/chem/senese/101/solutions/faq/why-salt-cools-icewater.shtml
http://chemed.chem.purdue.edu/genchem/topicreview/bp/ch15/colligative.php
http://hyperphysics.phy-astr.gsu.edu/hbase/chemical/meltpt.html#c1 

Tuesday, August 20, 2013

Working with Homefront

For the past month or so I have been going down to a summer camp for underprivileged kids to run science activities. It's a really nice place. They spend the morning working on academic things (one day I saw some kids playing math basketball!), and in the afternoon they do more typical summer camp activities like arts and crafts. So I got to come in as a "bonus" academic activity. I took took the kids in smaller groups.

Fun with Glurch
Every time I went I got a different age group.  I first had the teens, then 5th and 6th graders, 3rd and 4th graders, and then the kindergarten through 2nd graders. The first four times I went, I did pretty much the same activity set I did with my other afterschool program. The experiments were matter themed - first we did chromatography and talked about what molecules are and the fact that they move around. Next, we made Glurch and discussed its different properties, and why each one ended up slightly different (because I don't have time to accurately measure the ingredients, so it's all estimating). With the Oobleck, we could talk about states of matter. The straws didn't really relate to the matter theme, but we used them to teach about sound. And it was a nice, not too messy way to wrap up.

Wednesday, August 7, 2013

How Much Water Fits On a Penny?

Materials:
  • penny
  • eyedropper or pipette (if you don't have one this article explains how to make one)
  • water
  • other liquids
  • soap
Make a chart like this (or feel free to copy this one and print it):

Liquid
Predicted # of drops
Actual # of drops
 1.


 2.


 3.


 4.


 5.


 6.


 7.


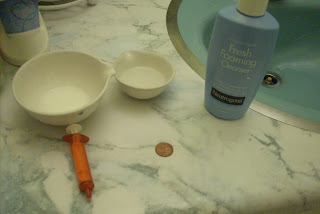
Though you can't tell, in the bowls are milk and salt water.
My supplies
For each liquid, you are going to use your eyedropper to carefully drop the liquid onto the penny until it spills over. Record the number of drops that fit. Try and make a prediction before you do it each time.

You can use any and all liquids you want (assuming they are non-toxic obviously). However, make sure you try this with both normal tap water and soapy water. And be sure to wash and dry your penny between each new liquid (and rinse off your dropping device as well).

What's Happening?

The atoms/molecules in a substance are all attracted to each other through intermolecular forces (IMFs). This can be because the molecules are polar (meaning one side is slightly more positive than the other) such as with water. Or it can be because the molecules are big enough that the electrons moving around can induce positive and negative poles. Whatever the reason, when the IMF is between molecules in the same substance, it is called cohesion. So all the molecules on the inside of the liquid are attracted to all the molecules around them. However the molecules on the surface of the liquid don't have any molecules above them to be attracted to, so they are more attracted to the molecules on the inside. This forms a "film" on the surface and keeps the liquid together in a drop.

Since water is polar, and therefore has high IMFs, its surface tension is relatively high. So more water should be able to fit on the penny before the surface film "breaks" and the water spills everywhere.

Image courtesy of factfixx.com
Here's my data chart:
Liquid
# of drops
     1.       Water
24
     2.       Water
26
     3.       Soapy water
23
     4.       Milk
22
     5.       Salt water
14

Huh... not what I expected at all! Except for the salt water, the number of drops is pretty similar in each. So either the explanation I just gave was wrong, or something happened in the experiment that I didn't account for. Even though the number of drops was the same, I definitely felt suspicious because the blob of soapy water on the penny just didn't look as big as the one from normal water had been. I also felt like the size of the drops were smaller. So since I was using a syringe with volume measurements marked on the side, I filled the syringe up to 1 mL each time and after I had finished dropping on the penny, I continued counting drops until I had emptied the syringe.

So here's my new data table:
Liquid
# of drops
# drops in 1 mL
Ratio
       1.       Water
24
23
1.0
       2.       Water
26
19
1.4
       3.       Soapy water
23
46
0.50
       4.       Milk
22
27
0.81
       5.       Salt water
14
22
0.64

Now the results make a little more sense. And it does make sense that the drops would be smaller - they have less surface tension to hold them together. I find it interesting though that none of the websites that reminded me of this activity (this isn't the first time I've done this, I actually distinctly remember doing the penny water drops experiment in 3rd grade) mentioned this fact. It might have just been the syringe I used. If anyone else tries this, I'd be interested in hearing how it worked out.

Learn more:
http://hyperphysics.phy-astr.gsu.edu/hbase/surten.html#c4
http://www.chem.purdue.edu/gchelp/liquids/tension.html 

Wednesday, July 31, 2013

S'mores at the Speed of Light

Materials:
  • Chocolate
  • Marshmallows
  • Microwave (you will need to know the frequency. If you can't find it the norm is 2.45 GHz)
  • Ruler
  • Something to do calculations on
  • Graham Crackers
 First, if your microwave has a rotating dish in the center, you will need to remove it. Or figure out some way to put food in so it won't rotate. Then lay your bar of chocolate (open it first!) on a plate to place it in the microwave in such a way that it won't rotate.

The red circles are the melted spots.

Image courtesy of Null Hypothesis
Microwave it for a bit, until there are 2 melted patches. 20 seconds should work. Now remove it from the microwave and use your ruler to measure between the two melted spots. Spread the marshmallows out on a plate and repeat.


Tuesday, June 18, 2013

Ice Cream

Since Summer is nearly upon us, now is the perfect time to learn how to make ice cream at home!

You'll need:

1/2 cup milk
1 Tablespoon sugar
1/4 Teaspoon vanilla

1/2-3/4 cups salt
2 cups ice
1 small (sandwich) ziplock bag
1 large (gallon) ziploc bag


Combine the first set of ingredients (the milk, sugar, and vanilla) in the small ziploc bag. Seal it thoroughly. To ensure it doesn't leak, seal this bag inside the 2nd small bag. Now, take the large ziploc bag and fill it with ice and salt. Place your small bag inside the large bag. Move the large bag back and forth, keeping the small bag in contact with the ice at all times. Do this for 10 -15 minutes or until the mixture appears frozen, adding more ice if necessary. The ice cream won't harden, it will remain soft but will be thicker than it was originally. To harden it more, you can put this in the freezer for half an hour (in a covered container). Or, you can remove the ice cream from the large bag and enjoy as is!

To make it chocolate flavoured, simply add a Teaspoon of cocoa powder. Instead of using ziplock bags, you can use a large and small coffee can (be sure to clean it out first!), or a small bowl placed inside a large bowl. When using bowls, you must constantly stir the mixture with an electric mixer or whisk.

Sunday, May 19, 2013

Chromatography

You'll need:
  • absorbent paper (paper towels will work)
  • a solvent (water, rubbing alcohol, or vinegar)
  • pens/markers - these depend on what solvent you're using. For example, Sharpies are alcohol based, so this won't work if you are using water. Common water soluble brands are Pilot, Foray, and Uni, but there are many more. Washable markers tend to be water soluble.
Draw a line about an inch from the bottom of your absorbent paper. Draw a small dash for each color of pen you are testing, leaving some space between each dash an between the edges. Cover the bottom of a container with a small layer of the solvent. Hold the paper in the water (or alcohol), being careful not to let the dashes be submerged. You can clip it to the edges, tape it to a pencil lain across the top, or simply hold the paper.

As the solvent travels up the paper, it will bring the ink with it. If the ink is made of multiple components, these will separate.

Chromatography is used to help separate something into components. For example, if you have a sample of ink from a message, you can use chromatography to compare it to other inks to figure out which type of pen wrote the message.There are many types (gas, liquid, thin layer, and paper) but this technique is paper chromatography.

The paper is called the stationary phase, and the solvent is called the mobile phase.  The substances affinity to each phase is what determines how far up the page the compound moves. Since "how far up the page is relative" - you could let the ink sit a long time in the solvent so the ink has more opportunity to be in the mobile phase - a better way to compare is needed. This is called the Rf value. The formula is Rf = [distance traveled by compound]/[distance traveled by solvent]. Comparing Rf values allows you to compare different substances.  If two substances have different Rf values then they are obviously different. However, just because the Rf values are the same doesn't mean the substances are.

One compound will have different values in different solvents. To verify two inks are the same, do chromatography with more than one solvent.

Sunday, May 12, 2013

At The Fair

Last weekend my town held a fair and I got to run a booth. I thought I would share my experiences with it. While it was overall successful (and very fun) there were several mishaps along the way.

Friday, May 10, 2013

Glurch


Glurch is very similar in behavior to silly putty (meaning it is also a non-Newtonian fluid). You combine Elmer's school glue and water in 50-50 ratio. Try and make the mixture completely homogeneous - in other words, no areas of extra water or glue, blend them completely. Then make a saturated solution of water and Borax. Borax is a laundry booster which helps lift stains. You will probably need a teaspoon for every cup of water. Add a small amount of this solution to the glue/water mixture and stir until it gloms together. It looks pretty slimy at first, but as you play with it more the extra water is removed and the Glurch becomes more putty-like.

Wednesday, May 8, 2013

Oobleck

This one's a classic.  Combine cornstarch and water in approximately equal proportions. And if you want, a little food coloring. When you start playing with it you'll notice that it's a little .... weird. You can actually grab a handful and pick it up - but as soon as you stop applying pressure to it the oobleck starts to drip out of your hand like a liquid. And if you get a speaker, cover it with plastic wrap and pour on some oobleck, interesting things start to happen.